I moved off GLM. For anyone who’s been following along, that probably lands like a small betrayal. GLM was my go-to for a long time. It’s the model I built the article on Stab’s Directive Hierarchy around. I said I was a GLM simp in that article, and I meant it.
Before anything is said, yes: I am a Z.ai simp. If you’re familiar with GLM and used Stab’s Directives on GLM-4.7, this’ll feel like the natural next form. It’s the same greatness you can come to expect from Zorgonatis at this point. That said, it’s pretty much similar, just better in almost every way. With GLM‑5’s extra headroom, there’s better handling of character dynamics, stronger continuity, and less chatter or deity‑worship of the user mid‑scene. The dialogue also flows way better in a way that feels more natural, or how you think a character would respond in a given situation. GLM-5 itself is just tight all around (..That was inappropriate), and Stab’s Directive GLM-5 preset tightens it even further (Enough!). This makes for a fun, well-structured, organized, and consistent RP session. Definitely one of the better GLM-5 Presets I’ve used. Also, it’s good as a Gemini roleplay preset. If you use that.
I’m not including my own tools/extensions here. This list showcases community extensions built by their incredible developers.
The Curse of Choices
Choices are a good thing, and choices are beyond plentiful in the world of SillyTavern extensions! The best SillyTavern extensions 2026 has to offer a new user is staggering. This is a fast-growing community, with a ton of helpful plugins out there. That being said, the resources for these kinds of things are a bit slim. They’re mostly relegated to the odd reddit post or some other corner of the internet (which is the whole reason I started RP|Fiend in the first place). So I thought it would be beneficial to do a little round-up of some extensions I found very useful. I may have already written an article on them, which I’ll link accordingly if you want to read more. Also, keep in mind that this is a list of extensions I’ve personally tried. If one of your extensions isn’t listed here, it doesn’t make it any less incredible or useful! Without further ado, let’s jump right into the best SillyTavern extensions 2026 has!
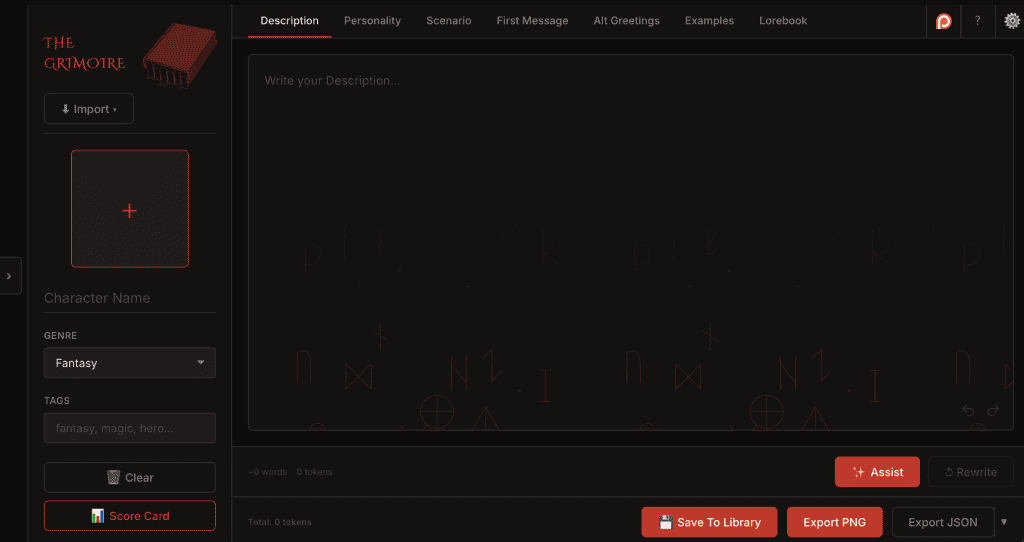
So, here I am again. I find it somewhat inconvenient to build new character cards. Most platforms have a built-in editor, and some of them don’t. As a full-time simpleton, I need something easy to use, convenient, and full-featured. Most importantly, NOT tied to a platform. There’s plenty of AI character card tools out there, but I, (yours truly), decided to take a jab at it, as I found them a little lacking in some of the features I was seeking. As such, I am pleased to present you with…
The Grimoire!
What is The Grimoire, exactly?.. I shan’t conceal it any longer!
What Is It?! Another AI Character Card Editor?!
..Ahem. The Grimoire is a free (free indeed!), browser-based AI character card editor I made. So no downloading, no installing, and nothing to setup or configure. It’s designed to be field by field, iteratively, with structure.
It supports V3 spec and exports both PNG and JSON, so don’t worry about what platform you’re using. As long as it’s able to read a standard-format character card, you’re golden. It’s not designed to be just a SillyTavern character card editor, even if that is my primary platform.
I designed it to be less of a generator, and more like a proper authoring environment. Character cards can be a personal thing, and I think that’s cool. I wanted the AI to actually assist, not takeover. Hence, any prompts sent are context-aware; factoring and inferring from the information you’ve already provided in other fields. It’s a pretty complete AI character card tool, with more planned.
Introducing a SillyTavern Lorebook Extension – Scribe!
Scribe is a personal little project I’ve been working on for a while. A SillyTavern lorebook extension for lazy people. I’m notoriously lazy. So much so that even when I use something like WorldInfo Recommender (which is great, by the way. Check my article on it here!), I still find myself too lazy to stop the story, open a menu, enter a prompt, and generate an entry. So I thought “Man, wouldn’t it be great to highlight a specific name, place, or entity, and simply make a lorebook entry without even having to open a menu?”. So I made Scribe! A lorebook editor that allows you to simply highlight text and create/update a lorebook entry.
How It Works
Scribe was designed for dummies, by a dummy. So it’s painfully simple to use. Listen up, dummy!
I realize now after writing a few guides on SillyTavern that I never made one of the more important ones: Getting the damned thing up and running. Luckily, SillyTavern is supported among all operating systems (even Android, although that IS Linux-based but won’t be covered here). This is meant to be a catch-all, simple guide on how to install SillyTavern on any platform ya got. Without further dribble, let’s begin!
Requirements (The Boring Part)
Windows: Windows 10 or 11 (64-bit, and no Vista pls)
Mac: macOS 12 Monterey or later
Linux: Any modern distro (Ubuntu 22.04+ makes this even more cake)
Node.js v18.16+ (LTS) (Simply select your OS when you get it here!)
Git (optional but recommended on all platforms. Get it here!)
How To Write a SillyTavern Character Card (Or for any platform, really) That Actually Has Soul!
So if you’ve checked out my guide on how to write a system prompt (which if you haven’t, check it out here if you’re curious), then you might be wondering how to write a SillyTavern character card. If you haven’t written one before, I suggest you do! Writing your own character card with his/her own quirks and caveats is one of the most enjoyable things you can do in this space IMO. My first character cards were terrible. Straight copy and pasted from the Wiki page of whatever flavor-of-the-month anime I was into. I’d slap in 2-3 adjectives, and an equally terrible first message.
But that’s the Curse of Hollow. A character, a name, and a picture if you really tried. But no personality. Nobody’s home, Charlie. However, much like system prompts, the way you write and fill those fields can make a huge difference. It’s not so complex to call it prompt engineering (*tips fedora*), but knowing exactly how to structure it in order to achieve a desired result makes all the difference, and you’ll notice!
Sometimes, you’re tapped out. It’s been a long day of work, a long day of chores, or a long day of nothing. Wouldn’t it be nice to just sit back and not have to think for once? SillyTavern Story Suggestions, or “Choices!” for short, is my love letter to address that issue (and before you say anything about the name, I’m not the most creative sort). It is a CYOA (choose-your-own-adventure) style extension that automatically generates one-click story suggestions for you. Instead of having to brainstorm and think of new ideas, the LLM thinks of them for you and your character acts out the option in a single click. So you no longer have to stop and think if you don’t want to. Now, you can let that sucker LLM do it for you while you sit back and… Consume. Create. Obsess.
Features
Now that the edginess is over, we can get to the more important details. Simply put, the purpose of this extension is to streamline the “What do I do now?” dilemma most hit at some point. Here’s some features, shamelessly taken directly from my github:
If you’ve spent time in SillyTavern, you’ve seen the system prompt field…*shivers*. The lazy either leave the default in place (guilty..), paste something they found on Reddit (uh..guilty?), or dump a wall of instructions in and hope for the best (GUILTY!)
Yes, I was indeed guilty of all three.
inb4 “Just download a preset, bro”, because I surely am.
But for the curious, the system prompt is the most impactful piece of text in your entire setup. It sits at the top of every context window, sets the behavior for your LLM, and directly shapes every response you’ll ever get from a character card. That means that, many times, a well-written character card will actually suffer from a crappy system prompt (or..it might be a crappy card too. In that case, you’re double f’d)
This guide is a little bit of my experience, breaks down what a system prompt does, how to structure one for AI roleplay purposes, what to stop doing immediately, and sprinkled in with a bit of Chemical X. Let’s get into it!
Out of all the GLM-4.7 presets I’ve used so far, this is my go-to. I’m a big fan. It’s well-structured, and naturally amplifies the way GLM’s reasoning works; which is based off chain-of-thought (reasoning step-by-step). The preset has several ‘tiered’ rules, that GLM-4.7 naturally follows. The output is more deliberate and consistent (think of it like a DM reviewing notes before a session). The tiers are comprised of: